


 Aug 14, 2015, 02:30 PM
Last edit by: IB Advertising
See related guides and technical advice from our community experts:
Browse all: Brake Guides
- Dodge Ram 2009-Present: How to Replace Brake pads/calipers/rotors
Step by step intructions for the do-it-yourself repairs.
Browse all: Brake Guides

DIY, front brake pad replacement...

Thread Starter
|
Hall Of Fame


Joined: Jan 2004
Posts: 12,946
Likes: 309
DIY Brake change '03 & up 2500 4x4's (most likely 3500 as well except drw... slight differences)
Wrench time approx 90~120 minutes.
Do this proceduree at your own risk!!! I am not responsible if you screw up. Consult the manual when in doubt.
This DIY writeup is intended for reference only, you should review the shop manual. It is intended to help those
who are unsure of what they are doing, if your not confident you can do this proceedure, take it to a shop for the
repairs. If you proceed, you do it at your own risk.
While most of us have done brakes before, there are some who have not and might need some help... so here we are
and here we go...
1st off, do not touch the surface of the new pads with your hands at any time, last thing you want is grease from
your hand getting on the pad surface.
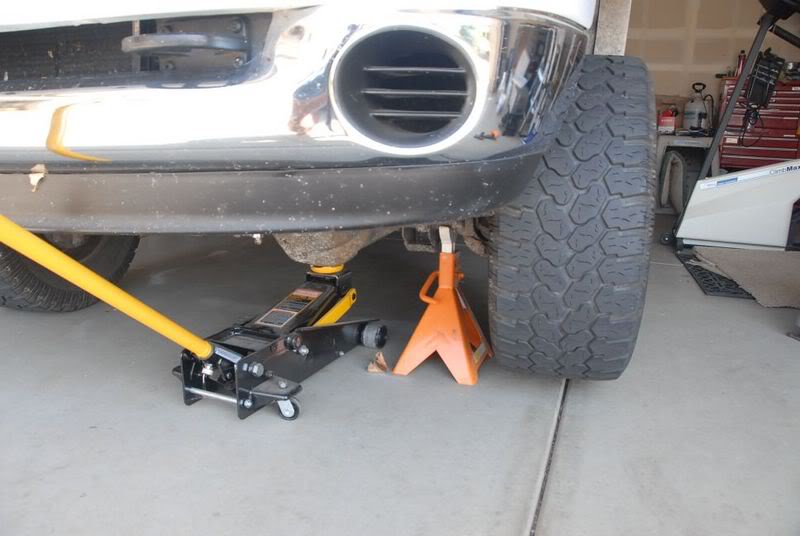
Jack up the front end (can do 1 side at a time) and support with jackstand.
Remove wheel
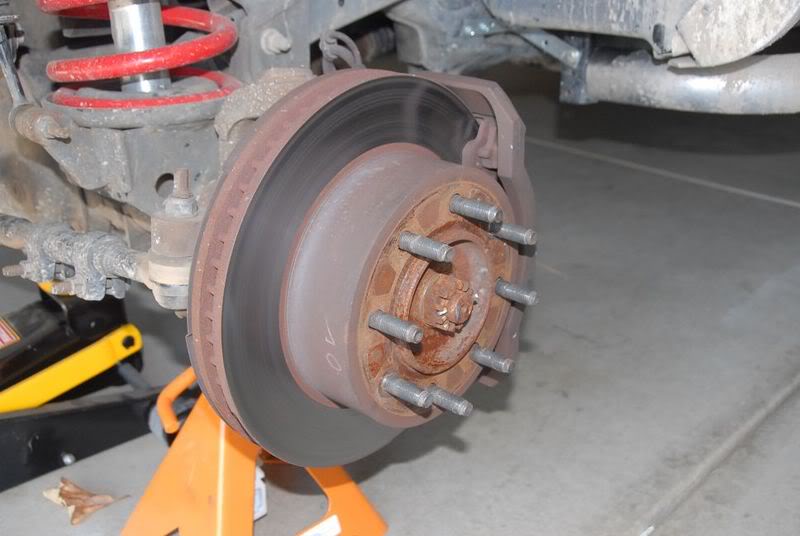
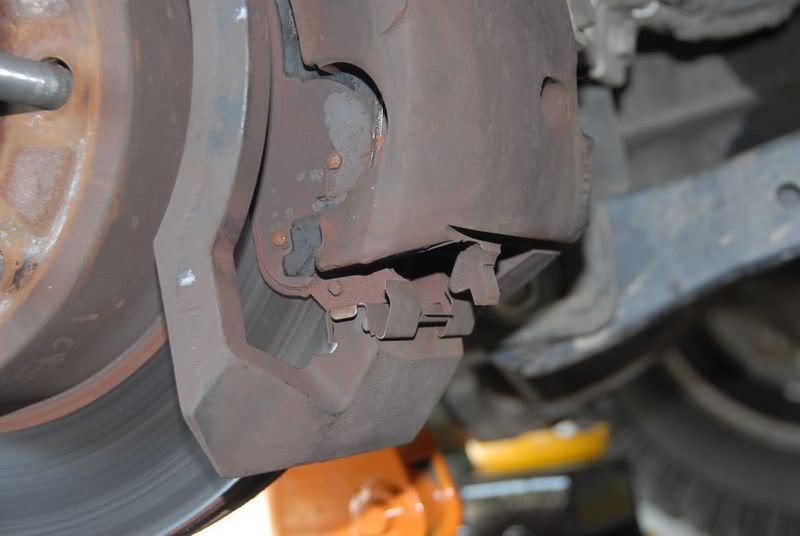
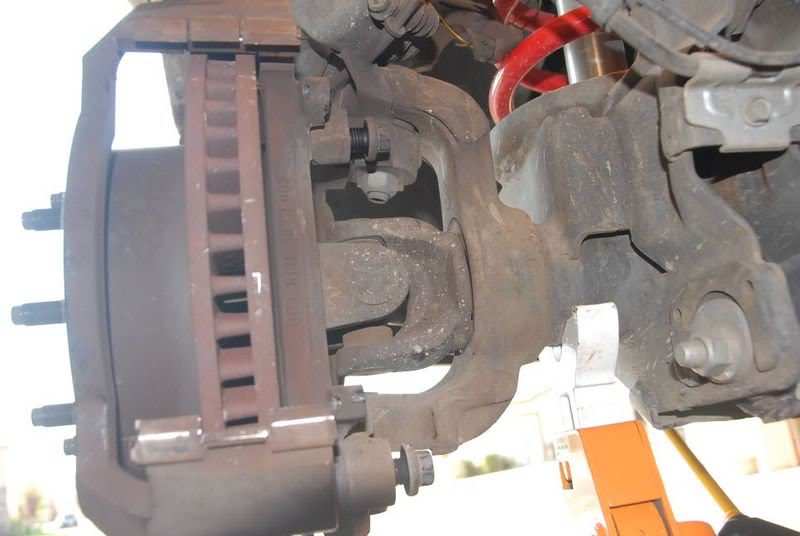
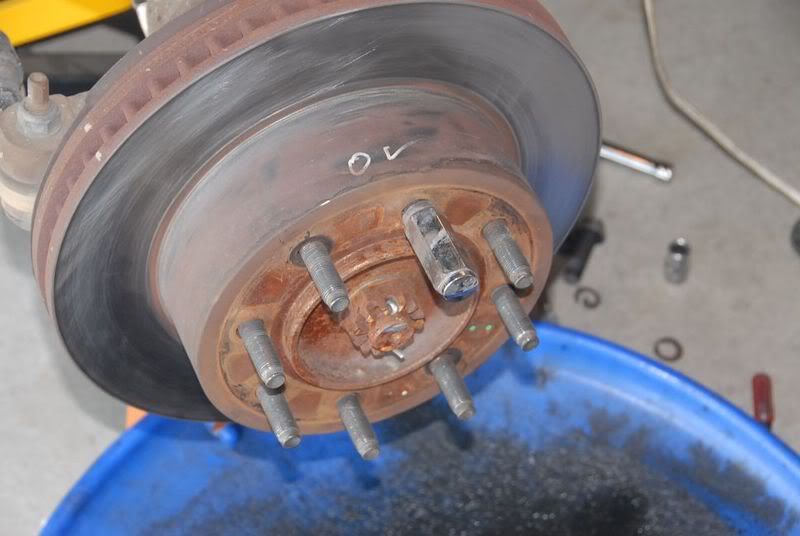
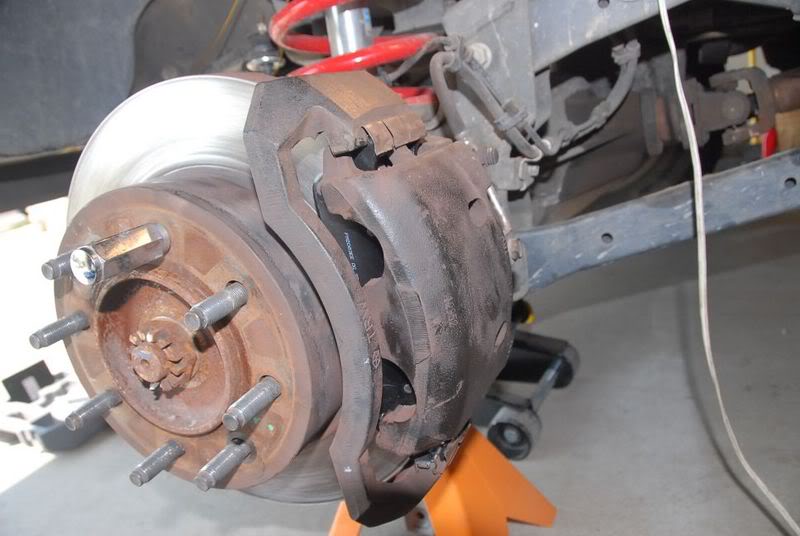
Here is the rotor & caliper assembly
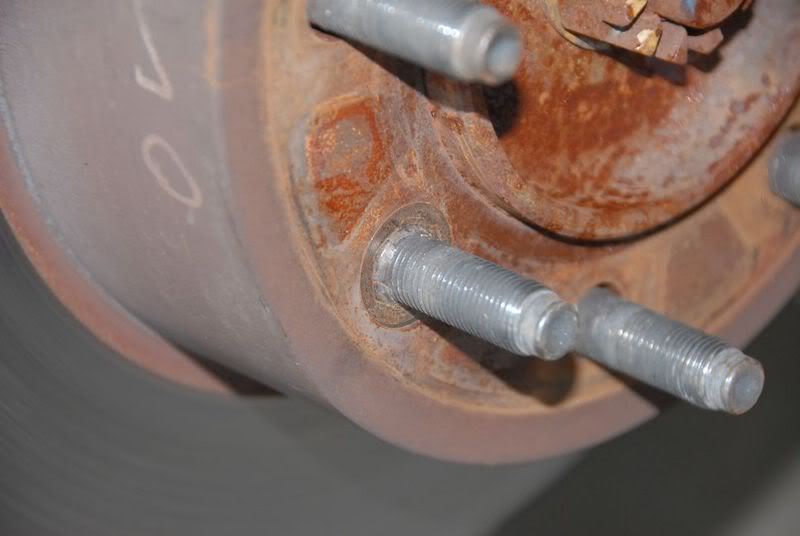
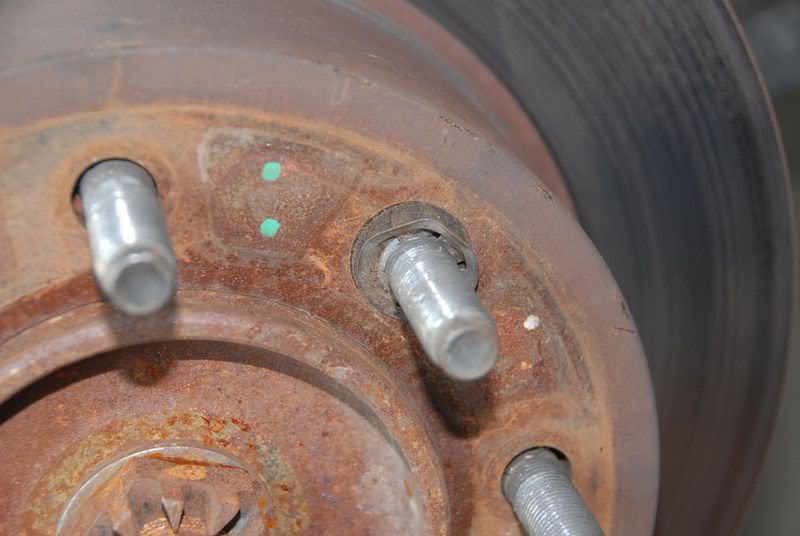
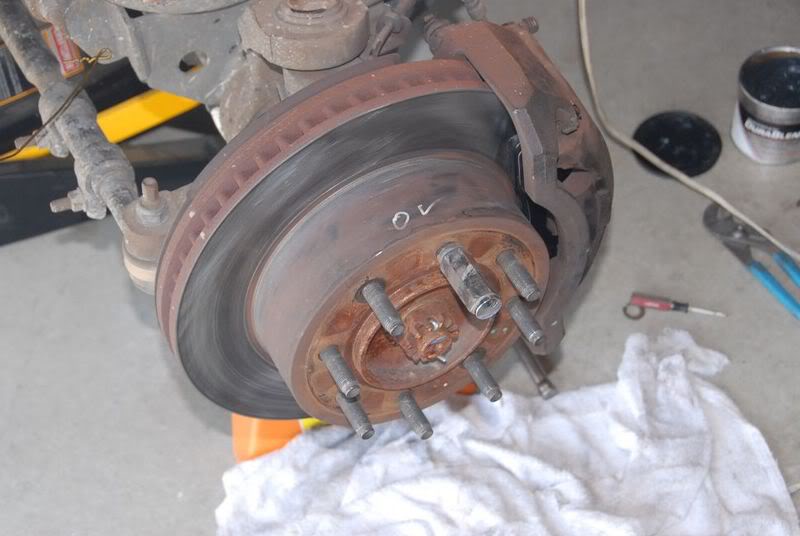
Here is a pic of the Clips holding on the rotor, these will get trashed on removal
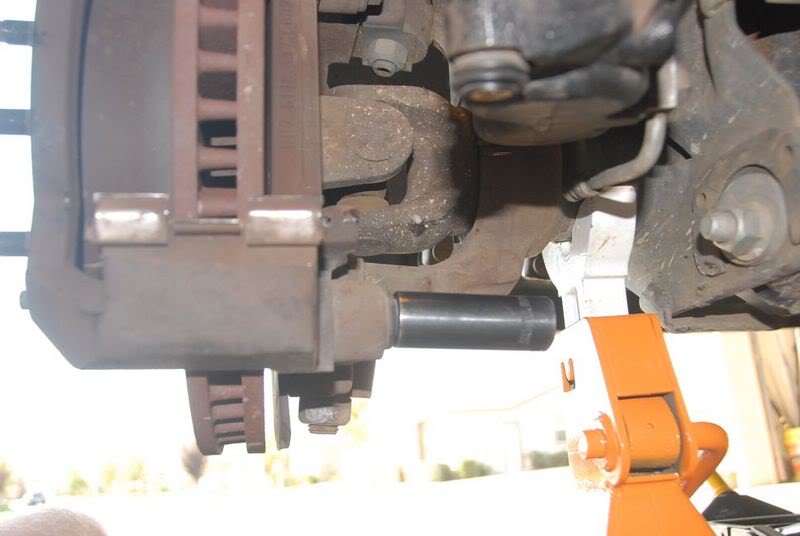
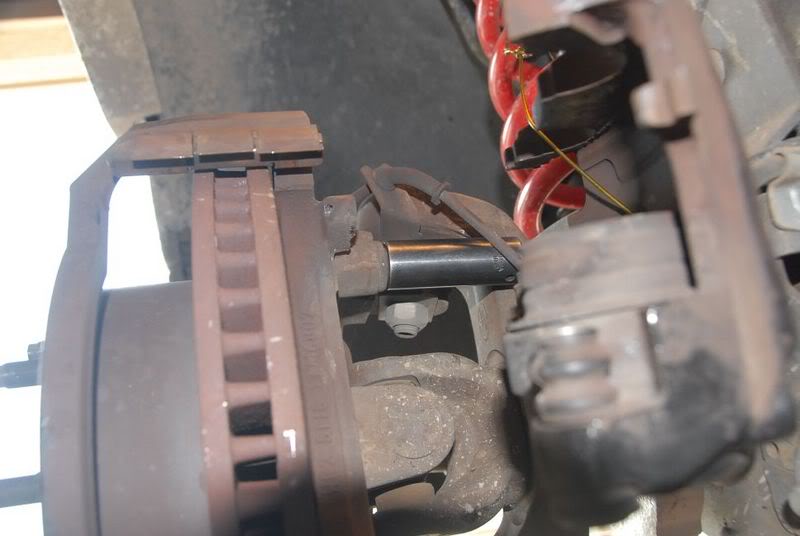
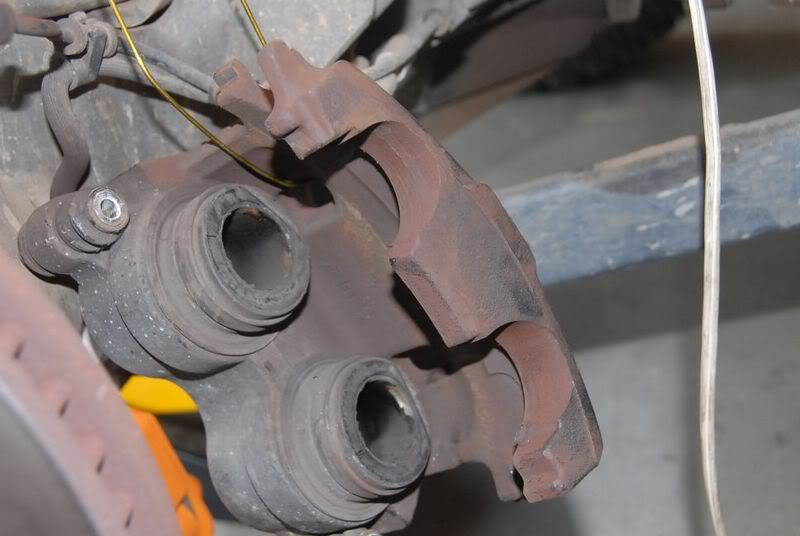
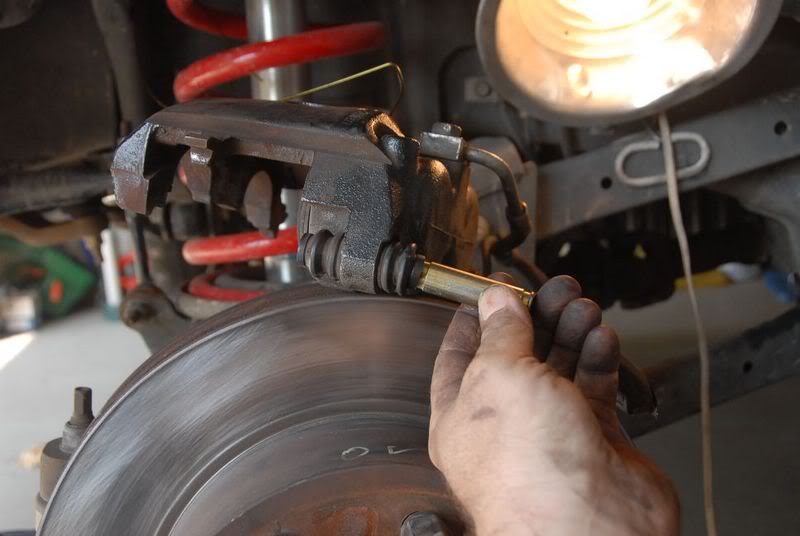
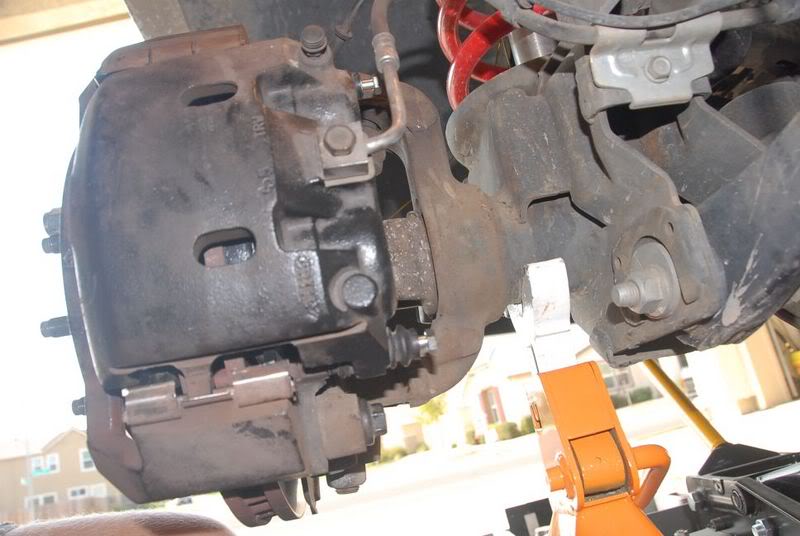
Remove the 2 bolts holding the caliper to the caliper bracket using a 13mm socket
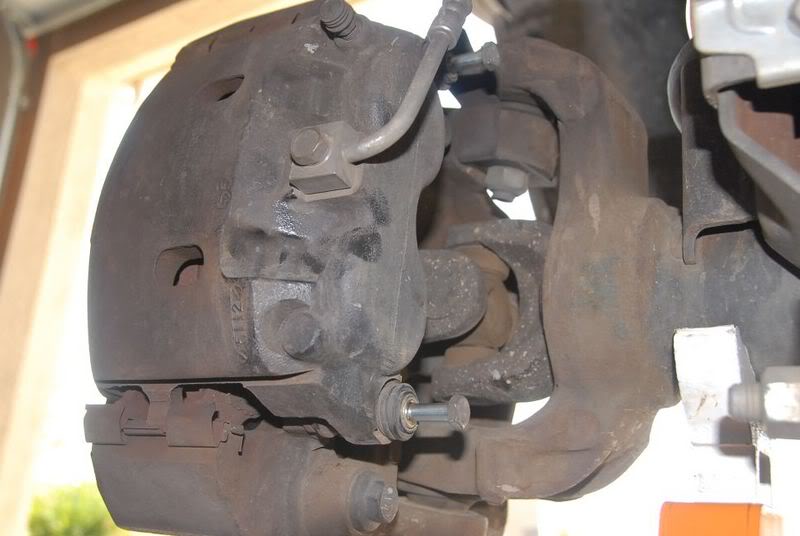
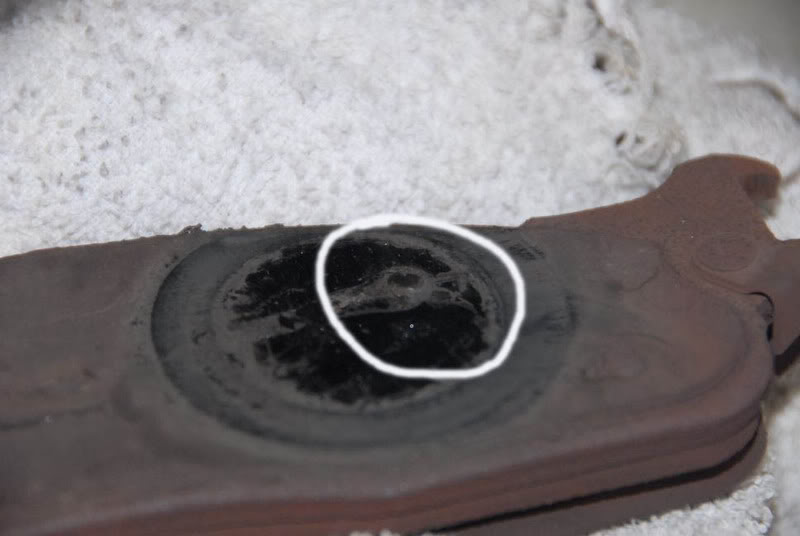
Using a screwdriver, pry up on the caliper on the end shown in the pic. the other end slides out of the bracket.
when you begin prying, you will most likely get hung up on the back of the rivet holding the material to the
plate. (circled in the next pic) You will have to compress the piston some to get the caliper off the bracket &
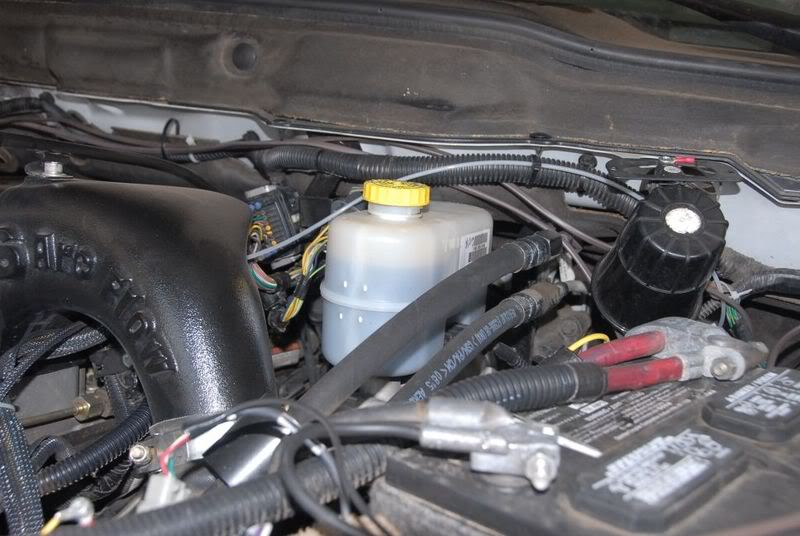
pads. Loosen the brake master cylinder lid so brake fluid has a place to go when you compress the piston. Once
free, support with a wire coat hanger or equivelant. Do not let the caliper hang by the brake lines!!!
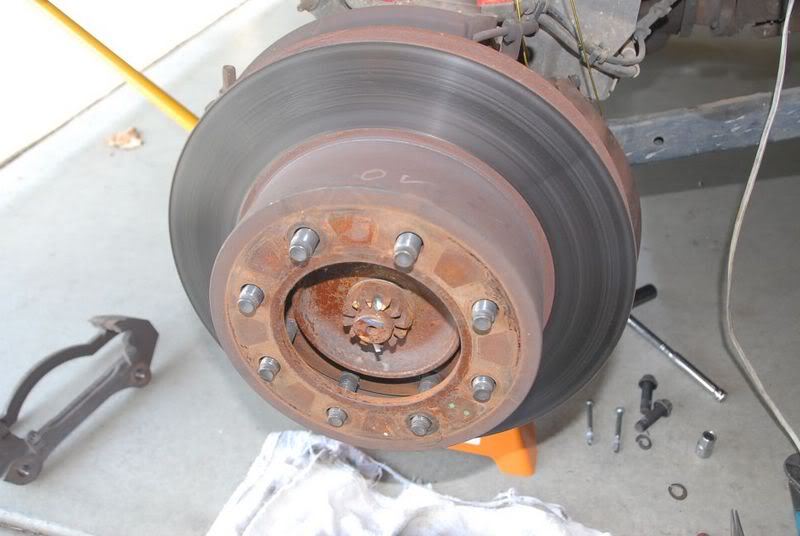
Remove the 2 mounting bolts on the caliper bracket using an 18mm socket. (and alot of umph)
Remove the rotor retaining clips and remove the rotor from the hub
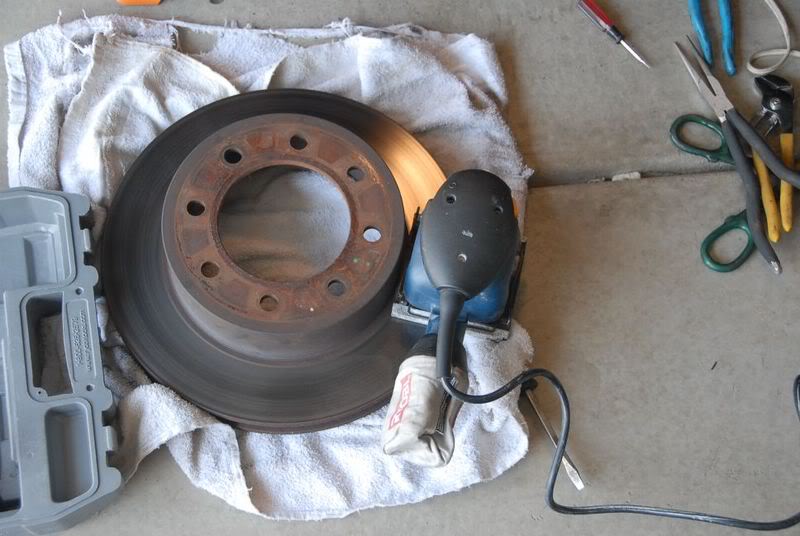
If your rotors are not warped or have any groves, you can get away with this step instead of getting the rotors turned, your option.
I have had great sucess sanding down the surfaces on good rotors. I used 150 grit paper. your objective here is
to scuff up the surface so the new pads can bed properly
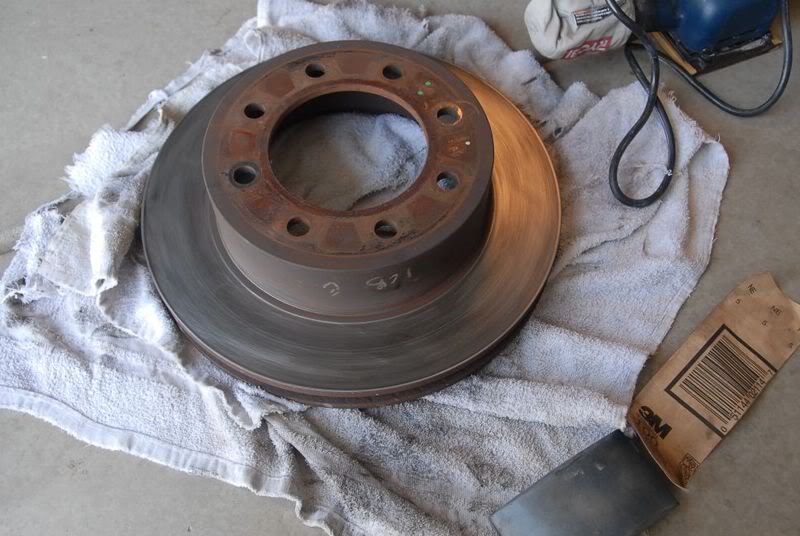
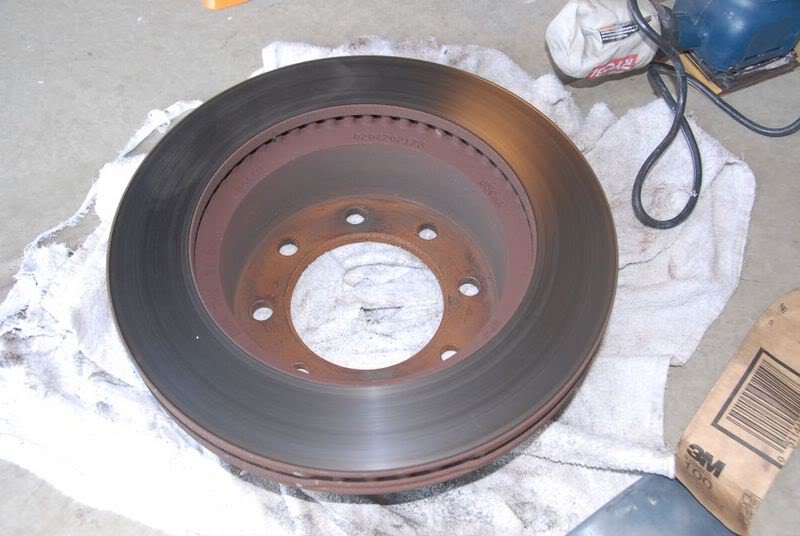
Once the rotor is preped, slide it on the hub backwards and clean it with BrakLeen (or equiv), then flip it around
and clean the otheside. You can use a lug nut to hold the rotor in place while cleaning & during final assembly
(unless you have new clips, install the clips to hold the rotor in place)

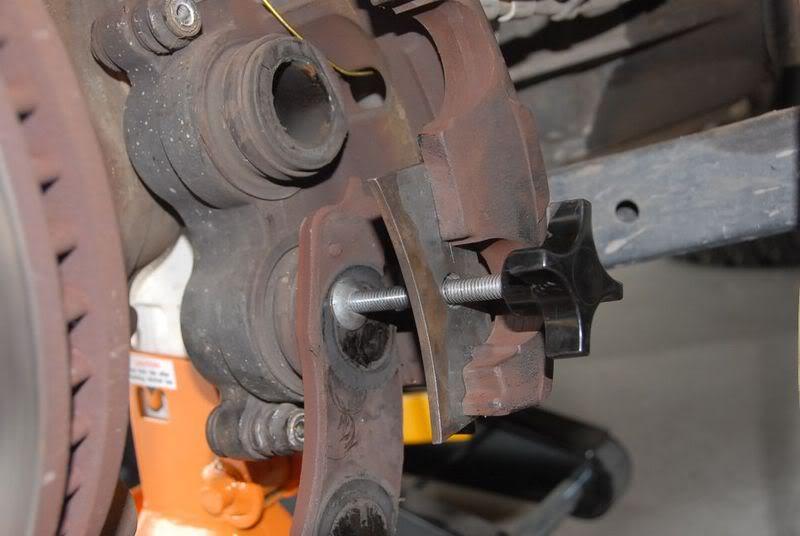
Next make sure you have plenty of room in the master cylinder for fluid. If not you may have to remove some.

Using a brake pad & caliper piston compressing tool, push both of the pistons back into the caliper until they
bottom out.
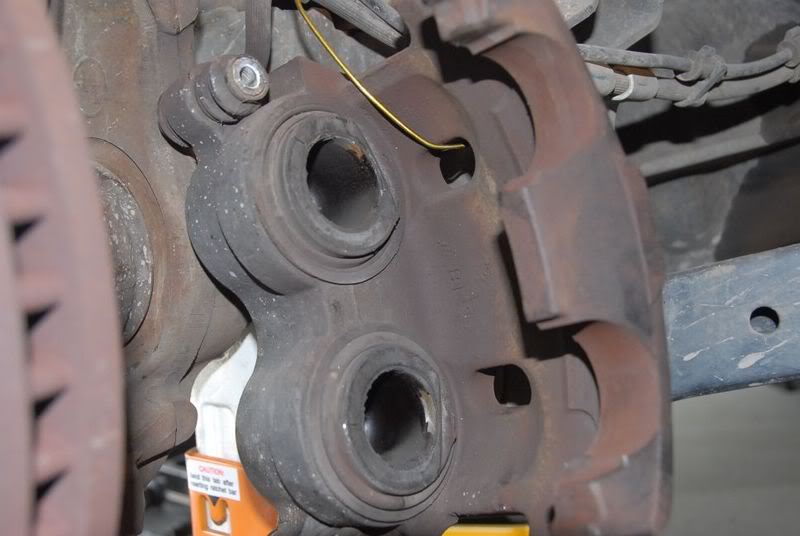
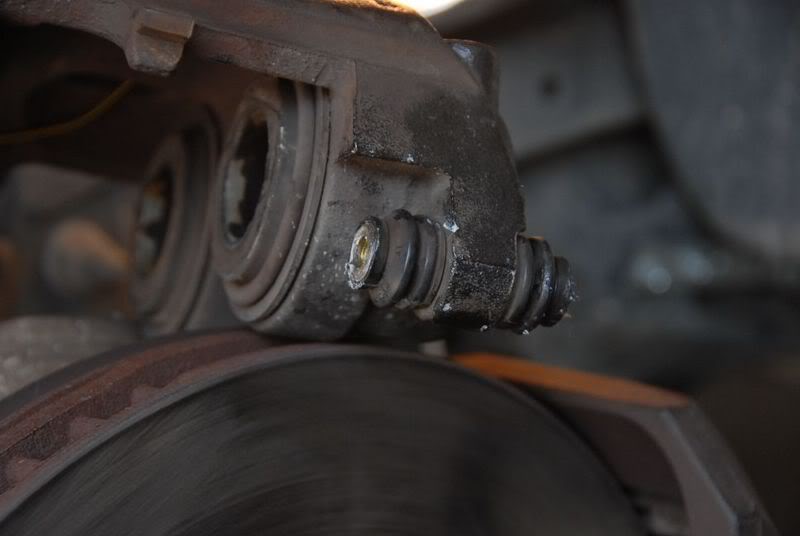
Next take a rag and clean the vibration clips that are on the caliper. You will be cleaning the area's where the
pads come in contact with the clips.
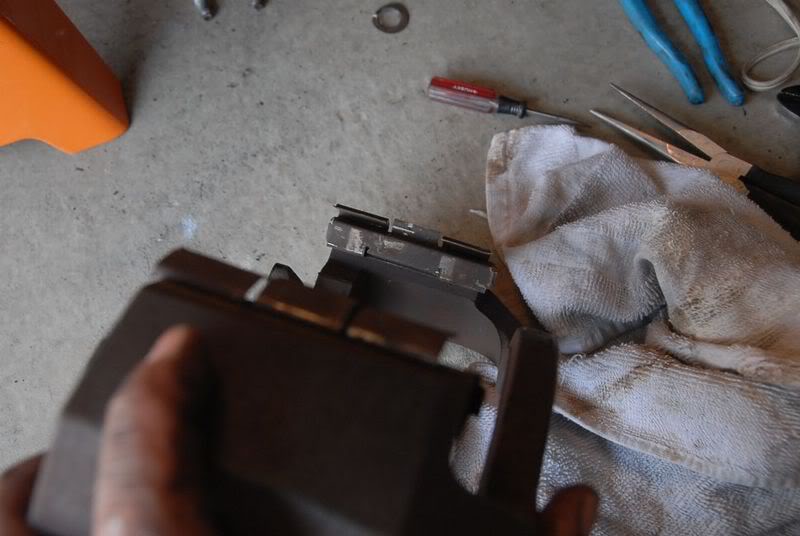
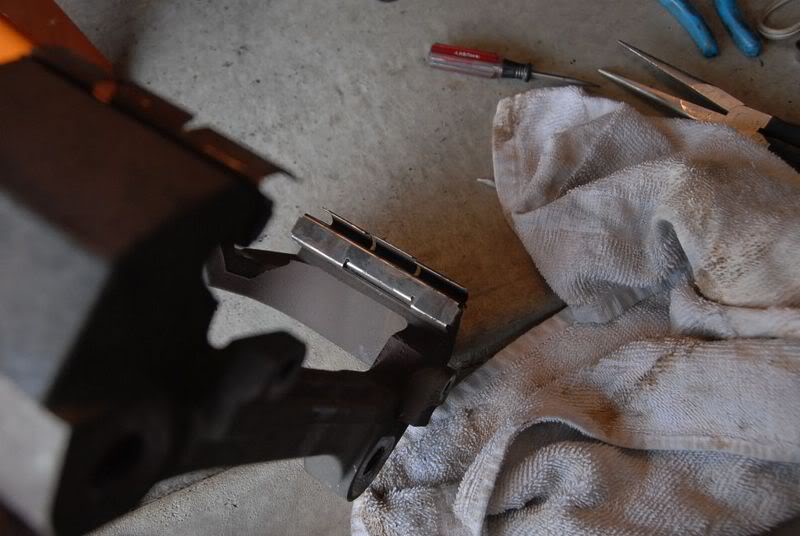
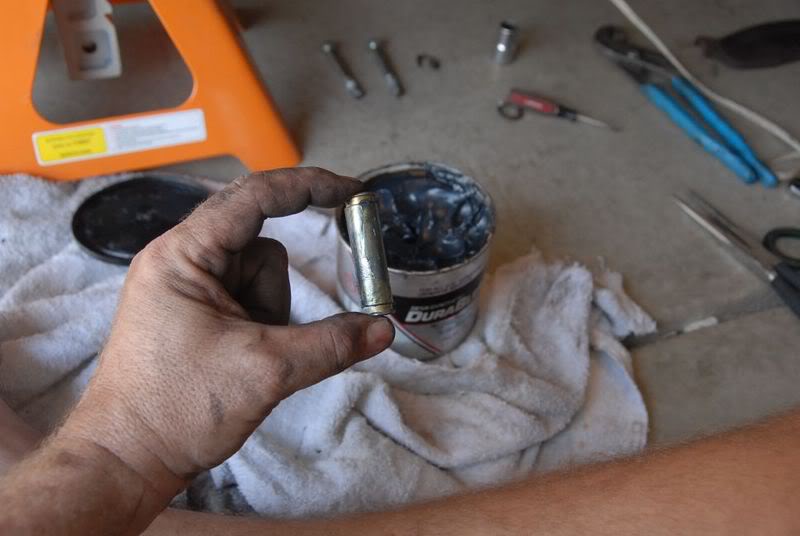
Pop out the pins that the calipers slide on and put a light coating of grease on them and re-install them. they
are floating inside the rubber boots and will pop out easily. be careful not to tear the boots.
Reinstall the caliper mounting bracket and torque bolts to 130 ft lbs (consult your manual to verify torque specs)
Next put a light coat of grease on the u shaped area on the pads, where they come in contact with the vibration
clips.
This allows the pads to slide easy and will not squeel.
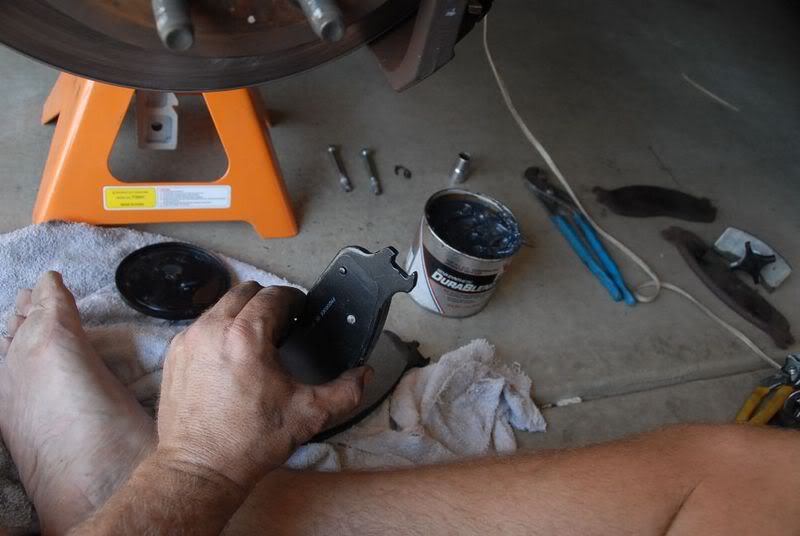
Install the pads and coat the caliper contact points to the pads with a light coat of grease, and on the piston
contact surface.
IF YOU GET GREASE ON THE ROTOR SURFACE OR PADS, CLEAN THEM WITH THE BRAKLEEN BEFORE PROCEEDING.
YOU CANNOT HAVE ANY GREASE ON THE ROTOR FACE OR PAD FACE.
Re-install the caliper onto the bracket and install the caliper and torque bolts to 20 ft lbs (consult your manual
to verify torque specs)
remove your lug nut and re-install the wheel. Torque wheel lug nuts to spec (consult your manual for proper
torque spec, I used 100 ft lbs)
Use the same procedure for the other side, once completed check the fluid level in the master cylinder and top off
as needed. make sure you close the lid before moving the truck.
Now for the fun stuff... jump in the cab and fire it up, apply the brakes a few times to push the pistons out to
the pads. 1st couple of times the pedal will go to the floor as the pistons move out to the pads. Once you have
a reasonably firm pedal, it's time to seat or bed the pads.
Beding the Pads & Rotors (taken in part from another publication off the web)
This procedure is best done in the country or on an empty road where you can not affect traffic.
From about 60 mph, gently apply the brakes to put some heat into the pads & rotors. This will bring them up to
operating temperature and will prevent you from thermally shocking the pads & rotors in the next steps.
Once the brakes are up to operating temperature, speed up to about 60 mph and stomp on the brakes hard and reduce
your speed to about 10~15 mph. Apply the brakes hard enough so that your not locking the wheels and the ABS is
not activating.
Once you reach 10~15 mph, accelerate back up to 60 and repeat 5~8 times until you feel the brakes fading. Once
they are fading your ready to cool the brakes down. Your brakes will most likely stink, this is normal.
Accelerate back up to 55~60 and drive for approx 10~15 minutes to allow the brakes to cool down. Try not to use
them as much as possible and avoid getting stuck in traffic. If you get stuck in traffic and come to a stop
before the brakes have cooled, "you will imprint pad material onto the hot rotors which can lead to vibration,
uneven braking and could even ruin the rotors"
After the 1st breakin cycle, you may need to let the brakes cool 100% and repeat the procedure to get the best
performance out of your brakes. (it's up to you).
Wrench time approx 90~120 minutes.
Do this proceduree at your own risk!!! I am not responsible if you screw up. Consult the manual when in doubt.
This DIY writeup is intended for reference only, you should review the shop manual. It is intended to help those
who are unsure of what they are doing, if your not confident you can do this proceedure, take it to a shop for the
repairs. If you proceed, you do it at your own risk.
While most of us have done brakes before, there are some who have not and might need some help... so here we are
and here we go...
1st off, do not touch the surface of the new pads with your hands at any time, last thing you want is grease from
your hand getting on the pad surface.
Jack up the front end (can do 1 side at a time) and support with jackstand.
Remove wheel
Here is the rotor & caliper assembly
Here is a pic of the Clips holding on the rotor, these will get trashed on removal
Remove the 2 bolts holding the caliper to the caliper bracket using a 13mm socket
Using a screwdriver, pry up on the caliper on the end shown in the pic. the other end slides out of the bracket.
when you begin prying, you will most likely get hung up on the back of the rivet holding the material to the
plate. (circled in the next pic) You will have to compress the piston some to get the caliper off the bracket &
pads. Loosen the brake master cylinder lid so brake fluid has a place to go when you compress the piston. Once
free, support with a wire coat hanger or equivelant. Do not let the caliper hang by the brake lines!!!
Remove the 2 mounting bolts on the caliper bracket using an 18mm socket. (and alot of umph)
Remove the rotor retaining clips and remove the rotor from the hub
If your rotors are not warped or have any groves, you can get away with this step instead of getting the rotors turned, your option.
I have had great sucess sanding down the surfaces on good rotors. I used 150 grit paper. your objective here is
to scuff up the surface so the new pads can bed properly
Once the rotor is preped, slide it on the hub backwards and clean it with BrakLeen (or equiv), then flip it around
and clean the otheside. You can use a lug nut to hold the rotor in place while cleaning & during final assembly
(unless you have new clips, install the clips to hold the rotor in place)
Next make sure you have plenty of room in the master cylinder for fluid. If not you may have to remove some.
Using a brake pad & caliper piston compressing tool, push both of the pistons back into the caliper until they
bottom out.
Next take a rag and clean the vibration clips that are on the caliper. You will be cleaning the area's where the
pads come in contact with the clips.
Pop out the pins that the calipers slide on and put a light coating of grease on them and re-install them. they
are floating inside the rubber boots and will pop out easily. be careful not to tear the boots.
Reinstall the caliper mounting bracket and torque bolts to 130 ft lbs (consult your manual to verify torque specs)
Next put a light coat of grease on the u shaped area on the pads, where they come in contact with the vibration
clips.
This allows the pads to slide easy and will not squeel.
Install the pads and coat the caliper contact points to the pads with a light coat of grease, and on the piston
contact surface.
IF YOU GET GREASE ON THE ROTOR SURFACE OR PADS, CLEAN THEM WITH THE BRAKLEEN BEFORE PROCEEDING.
YOU CANNOT HAVE ANY GREASE ON THE ROTOR FACE OR PAD FACE.
Re-install the caliper onto the bracket and install the caliper and torque bolts to 20 ft lbs (consult your manual
to verify torque specs)
remove your lug nut and re-install the wheel. Torque wheel lug nuts to spec (consult your manual for proper
torque spec, I used 100 ft lbs)
Use the same procedure for the other side, once completed check the fluid level in the master cylinder and top off
as needed. make sure you close the lid before moving the truck.
Now for the fun stuff... jump in the cab and fire it up, apply the brakes a few times to push the pistons out to
the pads. 1st couple of times the pedal will go to the floor as the pistons move out to the pads. Once you have
a reasonably firm pedal, it's time to seat or bed the pads.
Beding the Pads & Rotors (taken in part from another publication off the web)
This procedure is best done in the country or on an empty road where you can not affect traffic.
From about 60 mph, gently apply the brakes to put some heat into the pads & rotors. This will bring them up to
operating temperature and will prevent you from thermally shocking the pads & rotors in the next steps.
Once the brakes are up to operating temperature, speed up to about 60 mph and stomp on the brakes hard and reduce
your speed to about 10~15 mph. Apply the brakes hard enough so that your not locking the wheels and the ABS is
not activating.
Once you reach 10~15 mph, accelerate back up to 60 and repeat 5~8 times until you feel the brakes fading. Once
they are fading your ready to cool the brakes down. Your brakes will most likely stink, this is normal.
Accelerate back up to 55~60 and drive for approx 10~15 minutes to allow the brakes to cool down. Try not to use
them as much as possible and avoid getting stuck in traffic. If you get stuck in traffic and come to a stop
before the brakes have cooled, "you will imprint pad material onto the hot rotors which can lead to vibration,
uneven braking and could even ruin the rotors"
After the 1st breakin cycle, you may need to let the brakes cool 100% and repeat the procedure to get the best
performance out of your brakes. (it's up to you).


Banned
Joined: Feb 2007
Posts: 2,619
Likes: 0
From:
not to be an ars here, but using a sander or hand grinder on rotors is not quite right. if they need to be turned, go spend the $5 ea at autozone, checker, shucks, cragen, autoshack, napa, etc and have a proper machine do it level and smooth.
this is a great write up other wise man!!!
this is a great write up other wise man!!!
Thread Starter
|
Hall Of Fame
Joined: Jan 2004
Posts: 12,946
Likes: 309
ORIGINAL: bajafun
not to be an ars here, but using a sander or hand grinder on rotors is not quite right. if they need to be turned, go spend the $5 ea at autozone, checker, shucks, cragen, autoshack, napa, etc and have a proper machine do it level and smooth.
this is a great write up other wise man!!!
not to be an ars here, but using a sander or hand grinder on rotors is not quite right. if they need to be turned, go spend the $5 ea at autozone, checker, shucks, cragen, autoshack, napa, etc and have a proper machine do it level and smooth.
this is a great write up other wise man!!!
edit: oh yeah, forgot to mention... after bedding the brakes, it stops better than it did when I 1st got the truck with 13.8k on it. It'll be interesting to see how well it stops when the odo says 84k...

Veteran
Joined: Jun 2007
Posts: 324
Likes: 0
From:
Nice post Steve, and I am glad to see I am not the only one that works on the truck barefooted!
I may use your post very soon, I only have 5500 miles on the stock brakes and the SUCK! I gotta really get after the pedal to stop that thing!
I may use your post very soon, I only have 5500 miles on the stock brakes and the SUCK! I gotta really get after the pedal to stop that thing!

Captain
Joined: Dec 2006
Posts: 667
Likes: 0
From:
Good job SteveO!! You would fit right in here in South Carolina doing a brake job barefooted  . Im with ya on scuffin the rotors with sandpaper. Mine also stops as good or better than new with 110k on it.
. Im with ya on scuffin the rotors with sandpaper. Mine also stops as good or better than new with 110k on it.
Trending Topics
Thread Starter
|
Hall Of Fame
Joined: Jan 2004
Posts: 12,946
Likes: 309
I bet you can fix what you have... I'd take off the pads and sand the glaze off them as well as the rotors (use a 2x4 block or sanding block with 150 grit paper to keep the pads true, I dont think it takes alot of effort either), then follow the bedding procedure towards the end of the writeup. Like I mentioned before, mine stop so much better than when I got the truck... if Louie were in the back and I slammed on the brakes, he'd be doing a "Brian" (family guy... brian flies into the windshield when peter slams on the brakes)
and back to the turning of the rotors... IMO, the purpose of turning the rotors is to take out any groves & any warpage that might be in them... if there is none of either, I think it is not needed. When you turn the rotors you are shortening the life of them and opening up the possiblity to warp them easier (IMO from 25 years of messing with my rides).
and back to the turning of the rotors... IMO, the purpose of turning the rotors is to take out any groves & any warpage that might be in them... if there is none of either, I think it is not needed. When you turn the rotors you are shortening the life of them and opening up the possiblity to warp them easier (IMO from 25 years of messing with my rides).

Thread Starter
|
Hall Of Fame
Joined: Jan 2004
Posts: 12,946
Likes: 309
glad to here the positive feedback. I try to catch everything I need to when doing the actual work.
BTW, I think I almost have Louie trained... he no longer has to shove his nose into everything I'm doing in the garage lol, today he spent the time out there laying out in the sun
BTW, I think I almost have Louie trained... he no longer has to shove his nose into everything I'm doing in the garage lol, today he spent the time out there laying out in the sun