When you click on links to various merchants on this site and make a purchase, this can result in this site earning a commission. Affiliate programs and affiliations include, but are not limited to, the eBay Partner Network.
Thank you I look forward to seeing how it all goes together.
I got it out of the garage today. I took pics, but could not make the measurement you asked for. There's a trim panel that needs to be removed. Ordinarily no problem, but I attached an A/B speaker switch (12 wires) & an aftermarket time delay wiper module. It's a job (& a risk!) to take it off.
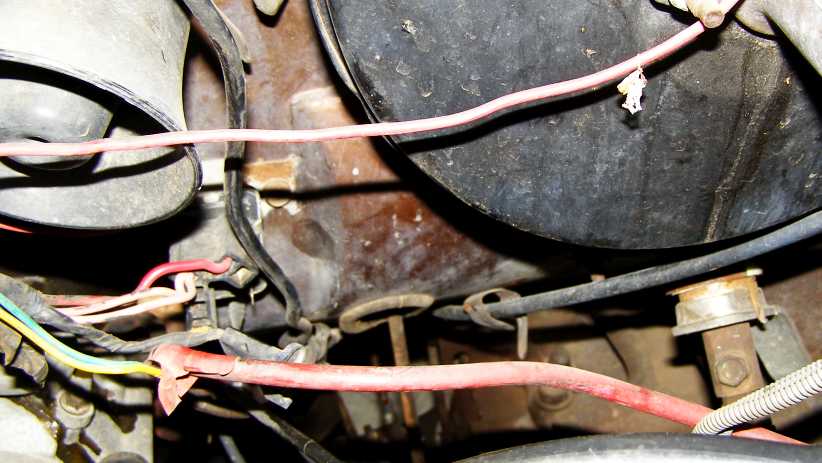
There is an indentation in the firewall where the grommet goes through. I took a couple pics just reaching the camera up under the dash showing the clutch pedal & pivot. I hope these help.
Regarding the last pic, some explanation: The illuminated switches on the left dash panel are: Amber for the halogen fog lamps (amber), Green for the slotted running board lights (also amber), and red for auxillary back lamps. Each has a separate relay (SPST), especially good for the foglights since they draw ~8 amps. The round light in the "mirrors" slot is just an indicator for the cruise control, which is aftermarket. Chrysler would not install cruise control on a manual transmission van. On mine, if you shift gears while engaged, the engine can race (thinking it's losing road speed), so it's good to know when it's on.
The van has had 2 alternator upgrades. It started life with a 75 amp, went to a 90A, then a 120A (largest offered). Aux lighting & higher power stereos take their toll...
That firewall pressing is definitely different to mine, though it's hard to tell how different. Not impossible, I guess. But your pics of the clutch pedal are at the pedal end, what I need is what is at the other end of the shaft. The bit that pushed on the rod to the master cylinder. Any chance of getting something of that?
That firewall pressing is definitely different to mine, though it's hard to tell how different. Not impossible, I guess. But your pics of the clutch pedal are at the pedal end, what I need is what is at the other end of the shaft. The bit that pushed on the rod to the master cylinder. Any chance of getting something of that?
I thought that's what you wanted, but there is no room to get a pic easily on the other end of the shaft. That bracket that holds both the brake & clutch pedal pivots blocks the view from beneath. I'll try to get a mirror & flashlight to see if I can get a "reverse angle" view on the clutch pedal shaft that actuates the master cylinder. There's a chance I might drop the steering column to get a better look. I have a rebuild kit for the steering shaft coupler (above the steering box - it has two shoes). I may not be able to do that job & end up sending it to a shop in May. If so I'll ask if they can take a picture of the exposed clutch pedal & master cylinder.
I like your posts about all yoyr travels. I wish I could take advantage of the gas prices & hit the road for an extended trip now. But where I live it's still a state-wide stay home order (as well as surrounding areas).
That firewall pressing is definitely different to mine, though it's hard to tell how different. Not impossible, I guess. But your pics of the clutch pedal are at the pedal end, what I need is what is at the other end of the shaft. The bit that pushed on the rod to the master cylinder. Any chance of getting something of that?
I saw your other post with drawings that seemed to show the hydraulic clutch pedal mechanism to the left of the clutch pedal. Maybe these drawings were from a truck? The van clutch pedal shaft passes to the right through the entire clutch/brake pedal bracket assembly, past the brake pedal, then outboard to the right of the bracket. There is a separate bracket which mounts the master cylinder (& makes it very hard to photograph). Note that the clutch pedal shaft attaches with a bolt & cotter pin, then has a "crank arm" which actuates the rod to the master cylinder. The master cylinder is really held on by that secondary interior bracket, not by the firewall grommet. It's almost impossible to photograph, but you can see the retainer behind the bracket in one pic.
I could not get in to measure anything - I could only reach up & keep talking pictures until I got some clear ones. I did, however, press the clutch pedal down & watched the red marks on the master cylinder shaft go in about 1-1/2" I hope this helps.
To my knowledge, the hydraulic clutch was available from '88 - '91 vans (corresponding to the PRE-Magnum throttle body injection engines), and probably the pickups & Dakotas. Maybe you can buy the hydraulic clutch bracket & linkage as a complete assembly, possibly one of your contacts could find one in a DIY salvage yard. We have a few of those within 30 miles of where I live in NE Ohio. Prices are very reasonable since you supply the labor yourself. I don't plan on visiting one soon - my automotive abilities are growing lesser as a result of medical conditions.
I now have a pretty good idea how it all works and I still reckon - even more so now - that the firewall shape is different in mine. Tackling trying to emulate that shape in the firewall is beyond my level of expertise and energy, I will look further but I reckon I'll continue to proceed with the present plan. You're right about those other diagrams being from pickups.
The hydraulic kit I bought does include a bolt-on mount for the master cylinder to sit in.
Just like you, I'm stuck and unable to travel very far. Well, I have to stay within this state, but it's a long way I can go in this state. From here to the Western border is about 900 miles, to the last of the sizable towns to the North it's about 1,200 miles. I can certainly drive all day and still be in this state. But the gearbox is in New South Wales, that's to the South and about 600 miles to my friend's place where I had it delivered off the ship. I could probably drive there, but it would be a risk because I don't have suitable cause (in their opinion), but if I did I wouldn't be able to cross back over the border to get home without being put into mandatory 14 day quarantine.
I'm glad you're enjoying the trip thread. It's still got over half of my last overseas trip to be added, then I have the trip I made to Central Australia last year to put on it. I am a bit slow finishing off the European part of the 2016 trip as I like to get all the places right and I largely followed the GPS and didn't know where I was some of the time!
But there's still some good stuff to come. The trip across Austria to Lichtenstein and Switzerland is next, and picturesque, but then I've got the Schlumpf Museum in France and the Mercedes Museum in Stuttgart over the next couple of days. In quick succession after that come the Solitudering, the Nurburgring, Spa-Francorchamps, a touch of Holland, a bit more Germany then Luxembourg and the North of France before I got on the boat to England.
Progressively it all gets revealed. After flying back across the Atlantic I struggled through Pennsylvania and Ohio. Which part of Ohio are you in? I had a bundle of fun trying to keep the van moving through there and in Indiana I had the carby rebuilt. But when I did that, the tuning whiz who did it immediately picked up what my problem had been ever since Helena MT! Then it ran like it should. And that was all to the good because I had plenty of country still to cover, including three and a half days in Colorado.
I'm east of Akron, Ohio. Akron is where I grew up. If you find yourself traveling through northern Ohio again, I recommend taking a trip to the Lake Erie Islands. You were probably on Rt 2 since you were avoiding the turnpike toll road & you must have passed them on your 1st trip just past Cedar Point. You can take a vehicle on a ferry boat (done many times with my van), or take the Jet Express. South Bass Island is more of the tourist island, while Kelley's Island is the largest on the American side. Pelee Island is the largest of all, and is on the Canadian side. The pic of the van is from one such trip.
And since your previous travels involved auto parts hunting, I would also recommend a pit stop to one of the three Pull-a-Part salvage yards. There's one in Cleveland, Akron, and Canton. Akron is my favorite. The pic shows the (former) Goodyear Airdock in the background. It held the title of largest free standing structure for many years (hard to park a blimp with columns!). There's room for 2 blimps to park. The doors open on railroad tracks. It actually "rains" in there - not thundershowers, but gets cloud-like formations & precipitates. Goodyear had to sell their aerospace division many years ago. It has Lockheed signs now.
At Pull-a-Part, they have a single pricing scheme. No kidding, one price per category for 4, 6, or 8-cyl engines no matter what make. If you find a premium Bose audio system, it's the same price as any other stereo (very inexpensive). I got a complete throttle body injection unit for my van as a spare. It comes with 2 injectors, throttle position sensor, manifold absolute pressure sensor, temp sensor, & idle motor, plus vacuum manifold. I think I paid $50 for it!
I look forward to reading about your travels. I hope to get on the road soon.
I now have a pretty good idea how it all works and I still reckon - even more so now - that the firewall shape is different in mine. Tackling trying to emulate that shape in the firewall is beyond my level of expertise and energy, I will look further but I reckon I'll continue to proceed with the present plan.
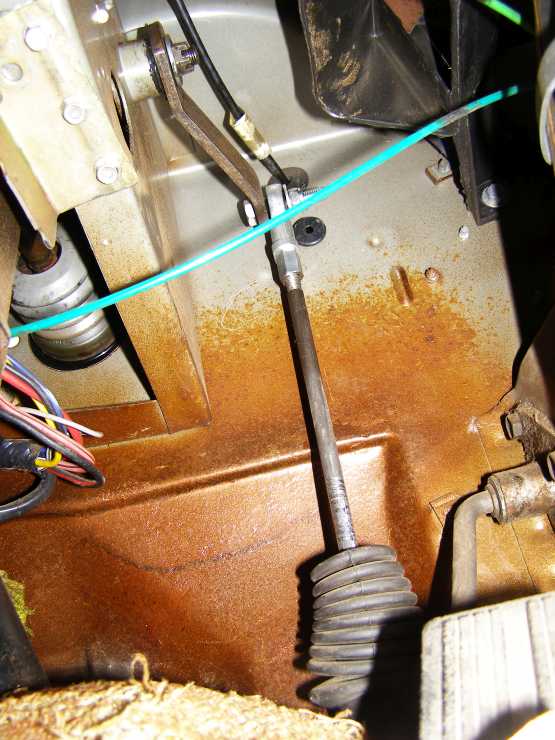
One thing I'm still missing: I'm not sure how the firewall geometry prevents a stock-like mounting. The same outboard bracket that contains the clutch pedal linkage appears to be the mounting point for the master cylinder Attached pic was supposed to be included above. To the left of the pic is the firewall, the right is the exterior of the bracket. If your firewall didn't have the depression, the master cylinder would just not protrude as much. You would have the same "stroke length" regardless of firewall. Worst case scenario, you may have to drill a second hole & grommet for the tubing feeding from the reservoir? The large grommet for the master cylinder looks to be just that, something to keep the weather out. It may provide some support, but doesn't appear to be the mounting "hard point." There are no bolts for the master cylinder mount.
We can correspond further by email if you like. I didn't see your address until yesterday. I'll send an email so you have a return address.
...which seems to indicate that recess in the pressing that yours has isn't there.
Inside reinforces this view:
You can see there how I've replaced the bent bits of rod in the original linkages with spherical rod ends. That didn't cost a lot and I'm sure it's helped reduce lost motion. I don't know what the longevity of those under the vehicle will be like. They've done 9,000+ miles so far.
We've had a major delay with this job, the gearbox arrived in the middle of the lockdown and I didn't get hold of it for a couple of months, now I've unpacked it all and the clutch plate has the wrong spline, so I have to wait for a fresh one with a 19-spline centre.
And it's got a shorter input shaft spigot, so I have to get the spigot bush which mounts inside the flywheel register. But that's all good, I'll take the opportunity to get a few other things shipped with these parts and take advantage of lower shipping costs. I might even get my idler arms at last.
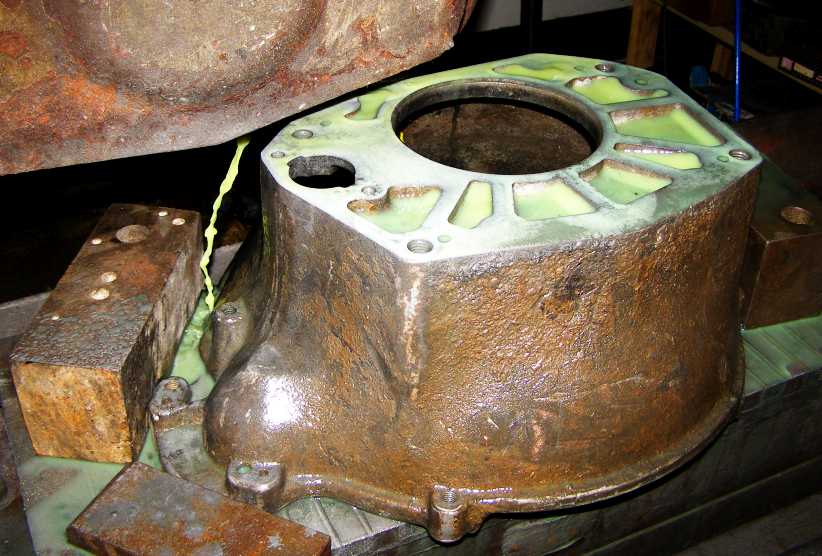
My nephew has refaced the back of the bellhousing for me...
...and I'll get on a lathe somewhere and make some offset dowels to make sure the thing is absolutely straight and square. I did get a driveshaft from a pickup (very rare here, only private imports) and had it shortened. I have to replace it next time I go to the US, of course.
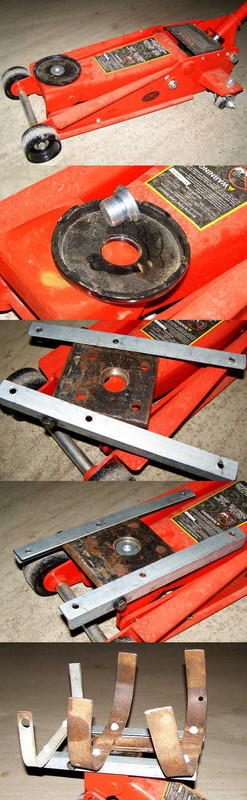
And the floor jack has been looked at with a view to using it to lift in the transmission. I made a frame which swivels on the original mount at the front of the jack and then worked up a frame which will carry the gearbox and also tilt to get the right angle:
Plenty of time to muck around with things during the lockdown...
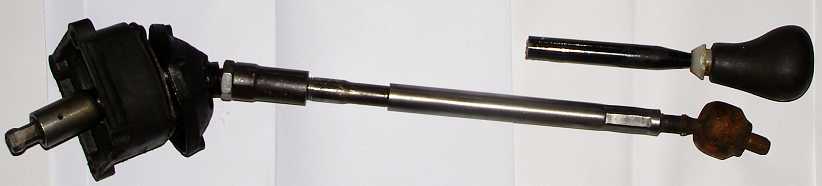
I've started putting together the gearlever for the van. The gearbox only has a stub sticking out of the top, this has a 16mm x 1.5mm thread. A couple of weeks ago I started looking around my stuff and found that a Falcon steering rack I had had the same thread for the tie rod ends. I pulled a tie rod end off that (it was knackered), then I cut a tie rod out of a scrap car at a friend's place in case I needed that piece to bolt into it.
The intention was, and has become the fact, to cut the tie rod end and use it as a joining piece to screw a lever into. A while back I sourced a bunch of odd bolts at the wrecker's when I was after something else and one of these bolts had a step in it to take its OD to 16mm... handy... and the other end had a 14mm x 1.5mm thread. Which is the thread found on the (mostly hollow) tie rod of a Peugeot 504. I have a few of those things lying around.
I went around to a friend's place to see if he had the tooling for his die-chaser to cut a 16mm x 1.5mm thread. I think it was the only metric one he had, anyway, he turned off the head of the bolt and cut the thread. And squared off the end of the remains of the tie rod end I'd sliced in two yesterday in the lathe... I cut that at the point where the internal thread ended, so there's plenty of thread in contact at both ends.
For some reason or other I had cut off the gearlever of the Mazda 626 I scrapped a couple of years ago, probably so I could get the boot, but anyway that's a piece of tubing about the right size to get itself welded to the other end of the Peugeot tie rod when I hack off the ball (which is knackered anyway) tomorrow. I'm not sure what length the lever needs to be yet, so I'll leave that until last, I think I have about two or three inches to spare there.
And guess what? The gearchange pattern on the **** from the Mazda is the same as the NV4500. Which matters because you must have the pattern showing to comply with local laws here.
Nothing goes to waste here, the lock nut from the throwaway tie rod still needs to go on this assembly to lock it up at the bottom end, I now need to go through my Peugeot nuts and bolts to find a 14mm lock nut from the Peugeot tie rod assembly, I do have them...


 04-19-2020, 10:16 PM