

2nd Gen Do It Yourself info

Thread Starter
|
Admin formally known as 94rt10ohio
Joined: Apr 2005
Posts: 9,025
Likes: 3
From: Curtice, OH
Look through this thread for other DIY threads along with the link below.
Thank you.
Click for Dakota 2nd Gen DIY.
Check out the 1st Gen Dakota FAQ and FAQ2 for tons of info and parts sites. Most works on 2nd Generation!
DIY's are supplied by you, our members! If you would like to add a DIYPM the DIY to HammerZ71or94rt10ohio
Thank you.
Click for Dakota 2nd Gen DIY.
Check out the 1st Gen Dakota FAQ and FAQ2 for tons of info and parts sites. Most works on 2nd Generation!
DIY's are supplied by you, our members! If you would like to add a DIYPM the DIY to HammerZ71or94rt10ohio
Last edited by Crazy4x4RT; Nov 6, 2009 at 05:43 PM.

Hall Of Fame


Joined: Jan 2004
Posts: 12,946
Likes: 309
The start of a 2nd gen Dak DIY thread... I will add to this as the DIY's are written, if you have any, send me a pm with a link to it and I will add it here.
These DIY writeups should be done at your own risk, I am not responsible for any mishaps while your wrenching... Always consult a manual before attempting any wrenching and I advise you to stay within your skill set. If your expanding your skills, work on the easy stuff 1st to gain skills and the necessary scars on the hands to fall into the "working man/woman" catagory
If you are writing one, look at the T-Case one below and see how I did it. use it as a guide.
1. 2nd gen dakota Transfer Case removal
2. Quick Drain Valve from Fumoto Engineering
3. Rack & Pinion Steering Swap (4WD)
4. DIY Throttle Position Sensor Fix
5. DIY O2 sensor cleaning
6. PDFs of multiple years/parts
7. DIY Front Brake Threading Issues.
8. DIY front grill inserts
[url=https://dodgeforum.com/m_1274495/tm.htm]
1. 2nd gen dakota Transfer Case removal
Transfer case Rebuild video.
http://www.youtube.com/watch?v=CslfaAN_V-E
2. Quick Drain Valve from Fumoto Engineering
http://www.fumotousa.com/
3. Rack & Pinion Steering Swap (4WD)
https://dodgeforum.com/forum/2nd-gen...-swap-4wd.html
4. DIY Throttle Position Sensor Fix
https://dodgeforum.com/forum/2nd-gen...ensor-fix.html
5. DIY O2 sensor cleaning
https://dodgeforum.com/forum/2nd-gen...ensor-diy.html
6. DIY Center Console
https://dodgeforum.com/forum/2nd-gen...nsole-diy.html
7. DIY Rust proofing with por 15 on an engine block
https://dodgeforum.com/forum/2nd-gen...-por-15-a.html
8. DIY front grill inserts
https://dodgeforum.com/forum/2nd-gen...grill-diy.html
9. DIY LSD Track Lok rebuild.
https://dodgeforum.com/forum/1st-gen...ml#post1866063
10. DIY Water Pump replace/ Tie Rods (Video)
https://dodgeforum.com/forum/2nd-gen...p-for-all.html
11. Hurst shifter
https://dodgeforum.com/forum/2nd-gen...-reations.html
12. DIY HHOGENERATOR
https://dodgeforum.com/forum/2nd-gen...generator.html
13. DIY Leaf spring removal for a drop
https://dodgeforum.com/forum/2nd-gen...or-a-drop.html
14. DIY 02 sensor shims
https://dodgeforum.com/forum/2nd-gen...y-02-sims.html
15. DIY replace Ball joints
https://dodgeforum.com/forum/2nd-gen...ml#post1982030
16. DIY Remove heater core and evaporator core.
https://dodgeforum.com/forum/2nd-gen...ator-core.html
https://dodgeforum.com/forum/1st-gen...tallation.html
https://dodgeforum.com/forum/2nd-gen...s-fixed-3.html
17. DIY Crank up torsion bars
https://dodgeforum.com/forum/1979009-post2.html
18. DIY Hardwire bypass foglight switch for HID setup
https://dodgeforum.com/forum/2nd-gen...hid-setup.html
19. DIY Bed tent
https://dodgeforum.com/forum/2nd-gen...t-writeup.html
20. DIY Ignition Lock Repair
http://www.stolenandrecovered.com/howto/hsg04a.php
21. DIY Cold Air Intake
https://dodgeforum.com/forum/2nd-gen...ir-intake.html
22. DIY Remote Program
https://dodgeforum.com/forum/2nd-gen...e-program.html
23. DIY Rear Sway Bar Bushings
https://dodgeforum.com/forum/2nd-gen...pic-heavy.html
24. DIY Electric Fan Install.
https://dodgeforum.com/forum/2nd-gen...ml#post2362607
25. DIY Auto Shifter Lock
https://dodgeforum.com/forum/2nd-gen...th-key-on.html
26. DIY Custom Flat bed build.
https://dodgeforum.com/forum/2nd-gen...nk-so-far.html
27. DIY Custom large cup holders https://dodgeforum.com/forum/2nd-gen...k-holders.html
28. DIY Custom Bumper https://dodgeforum.com/forum/2nd-gen...per-build.html
Last edited by Crazy4x4RT; Apr 4, 2012 at 12:13 PM.

Joined: Jul 2007
Posts: 27
Likes: 0
6. PDFs of multiple years/parts
http://www.jameskowalski.com/Dodge/Parts/index.html
that link does not work, there is a nice article on the site from Chrysler about removal of the links.
http://www.jameskowalski.com/Dodge/Parts/index.html
that link does not work, there is a nice article on the site from Chrysler about removal of the links.
Veteran
Joined: Sep 2008
Posts: 344
Likes: 0
Painting a vehicle
Painting a vehicle is really not as hard as you might expect. However, it is very time consuming and the final result is a direct result of the time put into the prep work. It took me and my dad two weeks to complete my truck working on it everyday. However, as most of you agree it cam out looking amazing and was well worth the effort.
STEP 1:
Gather all of you supplies. Automotive paint supply stores are hard to find so it is important to get everything you may need at one time unless there is one close by. For my truck we used Sherwin-Williams automotive paint.
List of Paint Supplies:
2 quarts of primmer plus the proper thinner for that primmer.
3 quarts of pigmented color(we used a one step system called 2nd demension which didn't require clear coat.) plus the hardener and thinner for the top coat.
2 quarts of flattener that is mixed in with the final coat to give it a flat finish.
Paint gun (we used a kobalt paint gun available at lowes)
compressor (one with a tank preferably and controllable pressure)
In line filters to prevent water from entering the paint.
Going to a shop personally will be much easier because they can tell you exactly the chemicals needed for the paint system you choose. An will have the technical data on the paint such as pressure to spray at and temperatures for drying and drying times.
You are also going to need to find a large garage to paint your truck in and to build a paint booth. We had about 6 feet of room to move around the vehicle when painting which was nice (a minimum of 2 feet is required to prevent runs.) Once you find a location start building a booth. We used painters plastic from lowes hardware for the walls and paper for the floor. The plastic comes in roles of 400 feet by 12 feet and the paper was 400 feet x 3 feet. Youre also going to need lots of tape for the booth and taping the vehicle.
Last edited by User; Mar 14, 2009 at 04:15 PM.
Veteran
Joined: Sep 2008
Posts: 344
Likes: 0
Step 2:
Once you have the booth and supplies begin disassembling your truck. The more you take off now the easier it will be. We removed the bumpers, mirrors, door handles, badges, tail gate, head lights, tail lights, and third brake light. Make sure you know were the bolts came from and keep them all together and organized when disassembling.
It should look something like this:
n593705744_1292200_498.jpg
and:
n593705744_1292201_711.jpg
After disassembling pull out the truck and spray it off with a pressure washer. Make sure to get all the grime off the undercarriage and that there's no dust in the cracks.
Last edited by zanethan; Jan 16, 2009 at 02:06 PM.
Veteran
Joined: Sep 2008
Posts: 344
Likes: 0
Step 3:
SANDING!!!! This is going to become your new favorite activity but it is one of the most important steps. We used a small orbital sander from lowes that used 6 inch sanding discs. Start by using 100 grit and work up to 220 grit. MAKE SURE YOU GET ALL THE CLEAR COAT OFF!!! If you don't the new paint will not stick to the truck. However, it is not necessary to take it down to primmer. Once you have sanded the truck feel the body panels for any imperfections in the existing paint. if there are you will need to sand those areas more or they will show up. If you need to preform any body wor this is also the time to do it. Sand the body to bear metal in those areas and apply bondo. Once it sets up go back with sanding blocks and smooth till you cannot feel the imperfections. Larger imperfections might require you to bang them out or pull them out. Make sure you take your time during the prep work it is the most important part!!!!!
It should now look something like this:
Last edited by zanethan; Jan 16, 2009 at 09:10 PM.
Veteran
Joined: Sep 2008
Posts: 344
Likes: 0
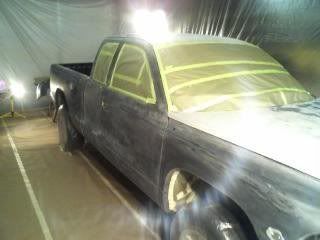
Step 4:
After sanding down the clear coat you need to wipe down the the truck with a tack cloth to remove ALL dust. Any remaining dust WILL show through the top coat if left on the truck. Once you have wiped down the truck go ahead and drive it into the paint booth and mask on the areas you don't want paint on. Take your time masking the truck to prevent tape lines and over spray. Make sure to cover the areas you wouldn't think about like the radiator, wheel wells, and wheels and tires.
It should now look like this:
n593705744_1292202_898.jpg
and:
n593705744_1298308_3800.jpg
Trending Topics
Veteran
Joined: Sep 2008
Posts: 344
Likes: 0
Step 5:
Primmer. You're now ready for primmer. It's a good idea to go ahead and wipe the truck again with a tack cloth and then you need to follow that by wiping it down with surface cleaner (available at the paint shop). Once the surface is clean go ahead and mix your primmer. Your primmer may vary but we diluted ours with a 1:1 ratio of primmer and thinner. It took about 4 quarts of diluted primmer to get complete coverage of the truck. Primmer is much easier to apply than top coat and will not readily run so you can apply it thicker than you normally would. Refer to the technical sheet of the primmer for drying times and application process.
It should now have a uniform Grey color. (sorry I didn't get pics of this.)
Veteran
Joined: Sep 2008
Posts: 344
Likes: 0
Step 6:
Sand again. Once the primmer has completely dried pull the truck out of the paint booth to sand it. Use a fine grit sand paper we used 1000 grit or so. Sanding outside will help keep the paint booth clean and prevent any dust getting blown onto the top coat. It will also allow you to sweep out the paint booth and remove any dirt that might have gotten in. Use sanding blocks to lightly sand down the primmer. You just want to make it smooth don't sand so much that it that it removes the primmer. The primmer creates a lot of dust and is easily sanded. Once you finished sanding blow off the dust using the compressor and then follow up by wiping it down with a tack cloth again. Once you think all the dust is gone pull the truck back into the paint booth. Seal the booth again and wipe the truck again with a tack cloth and then follow with the surface cleaner again.
Sand again. Once the primmer has completely dried pull the truck out of the paint booth to sand it. Use a fine grit sand paper we used 1000 grit or so. Sanding outside will help keep the paint booth clean and prevent any dust getting blown onto the top coat. It will also allow you to sweep out the paint booth and remove any dirt that might have gotten in. Use sanding blocks to lightly sand down the primmer. You just want to make it smooth don't sand so much that it that it removes the primmer. The primmer creates a lot of dust and is easily sanded. Once you finished sanding blow off the dust using the compressor and then follow up by wiping it down with a tack cloth again. Once you think all the dust is gone pull the truck back into the paint booth. Seal the booth again and wipe the truck again with a tack cloth and then follow with the surface cleaner again.
Last edited by zanethan; Jan 16, 2009 at 09:10 PM.
Veteran
Joined: Sep 2008
Posts: 344
Likes: 0
Step 7:
You're now ready for paint. If you used plastic to cover the radiator i would recommend recovering it because it will flake and send primmer flacks into the top coat. It's important to note the temperature of the booth at this point and mix the paint components accordingly. For the top coat we used 3 quarts of color plus hardener and flattener. It took 5 quarts or mixed paint total to cover the truck. Refer to the technical sheet for your paint for the ratios needed for that system. Set your compressor to the right pressure for spraying and adjust the spray pattern by spraying the walls f the paint booth. Once the gun is dialed in start spraying the truck. We started on the roof and worked our way down but you can start any where. Use long even strokes and hold the gun about 2 feet from the vehicle. DO NOT STAY IN ONE PLACE LONG. It's easier to come back to an area than it is to get rid of a run.
The technical sheet will tell you the drying time between coats based on the temp. We waited 7-10 minutes between each coat. If you don't allow enough time the paint will sag and it will look like a wave on the side and runs will appear. We applied about 3 coats of final paint. After your last coat check thoroughly that you have covered ALL bear metal and are satisfied with the paint. Once you're satisfied leave the booth and allow to dry. I recommend not thinking about the truck for a few days to allow for drying time, but it should be dry to the touch in a day.
It should now look like this:
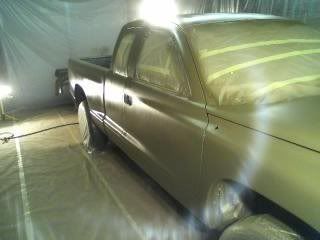
and:
n593705744_1298309_3948.jpg
and:
n593705744_1298311_4241.jpg
You're now ready for paint. If you used plastic to cover the radiator i would recommend recovering it because it will flake and send primmer flacks into the top coat. It's important to note the temperature of the booth at this point and mix the paint components accordingly. For the top coat we used 3 quarts of color plus hardener and flattener. It took 5 quarts or mixed paint total to cover the truck. Refer to the technical sheet for your paint for the ratios needed for that system. Set your compressor to the right pressure for spraying and adjust the spray pattern by spraying the walls f the paint booth. Once the gun is dialed in start spraying the truck. We started on the roof and worked our way down but you can start any where. Use long even strokes and hold the gun about 2 feet from the vehicle. DO NOT STAY IN ONE PLACE LONG. It's easier to come back to an area than it is to get rid of a run.
The technical sheet will tell you the drying time between coats based on the temp. We waited 7-10 minutes between each coat. If you don't allow enough time the paint will sag and it will look like a wave on the side and runs will appear. We applied about 3 coats of final paint. After your last coat check thoroughly that you have covered ALL bear metal and are satisfied with the paint. Once you're satisfied leave the booth and allow to dry. I recommend not thinking about the truck for a few days to allow for drying time, but it should be dry to the touch in a day.
It should now look like this:
and:
n593705744_1298309_3948.jpg
and:
n593705744_1298311_4241.jpg
Last edited by zanethan; Jan 16, 2009 at 02:07 PM.